Get the fix for the Windows setup error “Setup was unable to create a new system partition” that appears when attempting to install the following versions of Windows from a bootable USB: Windows Vista, Windows 7, Windows 8, and Windows 10.
Error Details
If attempting to install Windows from a USB drive, external drive, thumbdrive, USB stick, etc instead of using a CD or DVD, the following error can appear:


Setup was unable to create a new system partition or locate an existing system partition. See the setup log files for more information.
Causes of this error
This error is hardware-dependant and its appearance varies from PC to PC. It depends on your motherboard, your USB interface, the USB stick you are using, and the version of Windows you are installing.
During setup, Windows must identify which drive is your primary boot drive in order to correctly configure the MBR and bootloader. This error does not normally apply to EFI and UEFI installations of Windows 7, Windows 8, or Windows 10. You can read everything there is to know about the MBR configuration and boot process here.
Depending on how your PC is configured and which hardware you are using, Windows setup can sometimes be unable to tell which drive is an external USB drive and which drive is a local disk that Windows should be installed to. This especially happens when using larger USB drives to install Windows or if you have configured your BIOS to boot from the USB drive first always. Also, some USB sticks present themselves to Microsoft Windows as a regular drive instead of identifying as a bootable USB.
If Windows setup cannot reliably determine which is the boot drive, this error will appear.
Fixes for this error
Fix #1: Eject and re-insert the USB
The easiest solution for this error is to force Windows to re-arrange its ordering of the drives. When you get this error message, it is possible to work around it easily without having to use diskpart or manually re-partition your disks and drives:
- Upon seeing the error message “Setup was unable to create a new system partition or locate an existing system partition,” remove your Windows setup USB from the PC (don’t worry, this is safe since no read or write operations are being made from the USB disk).
- Press the red “X” button to exit the installation wizard. You will be asked to confirm that you’re sure you want to do this and that Windows will not be installed if you do. Press OK and exit anyway. You won’t actually leave the setup environment, you’ll just be taken back to the main page.
- Back at the main setup page, select “Install Now” without re-inserting your USB stick.
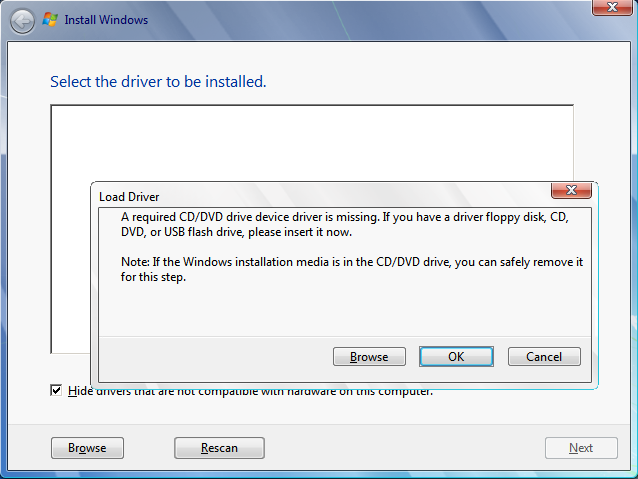
- You’ll see an error about Windows being unable to locate setup files, and asking you to load a CD/DVD driver for Windows setup to proceed:
- Click “OK” then exit the setup dialog once more to return to the main setup screen.
- Re-insert your USB at this point, then select “Install Now” again.
This time, everything should go as planned since Windows has been forced to recognize that the setup USB is a removable drive, and it can identify the correct boot drive to install the Windows boot files to.
Fix #2: Manually create the boot partition
If you prefer to do this manually, you can use diskpart from the Windows setup command line to copy the setup/installation files from the USB to the local drive and then use the local drive to both boot from and install to, bypassing the USB completely and preventing Windows from getting confused:
- Press Shift+F10 at the dialog where you see the error message in question to bring up a command line console.
- In the console, type diskpart.exe and press enter.
- Now type in the following within diskpart:
list disk(and make note of the disk number to install Windows to)select disk=0(where disk 0 is your destination drive, so be careful, all information on this drive will be removed)create partition primary size=xxx(where xxx – is the size of new partition)select partition=1activeformat fs=ntfs quickassignexit
- Navigate to USB flash drive, for example:
cd d: - Copy all files from USB drive to C: drive:
xcopy d: c: /e /h /k - Make your C: drive bootable with following command:
bootsect /nt60 c: bootsect /nt60 c: /mbr - Eject the USB drive from your computer, and restart
- Boot back into Windows setup and select “Install Now”
So helpful thanks a million. just saved my computer
ReplyDelete